
Equipment
Hockey Equipment Loan Program
We understand that getting started in hockey can feel overwhelming—especially when it comes to equipment. That’s why Beaver Dam Hockey offers an equipment loan program to help families ease into the sport.
For our Learn to Skate and Hockey 1 & 2 programs, we provide full sets of loaner equipment at no cost. If your child chooses to continue and register for their first full hockey season, they can keep using that loaned gear throughout the season. This gives families time to gradually purchase their own equipment without needing to buy everything up front.
We simply ask that all borrowed gear is returned in good condition by the end of the season. Players will need to have their own full set of equipment before beginning their second season.
If you have questions about what’s included or need help sizing gear, we’re happy to assist. Our goal is to make it easy for your child to try hockey and grow in the game!
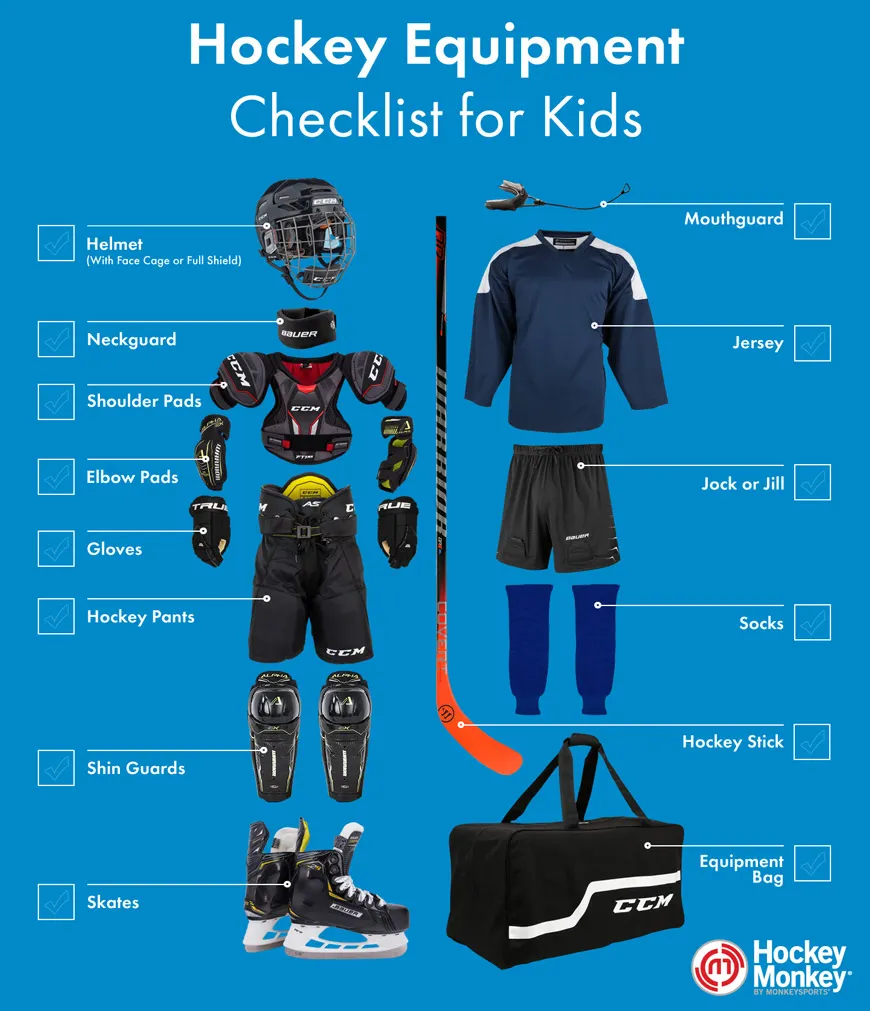
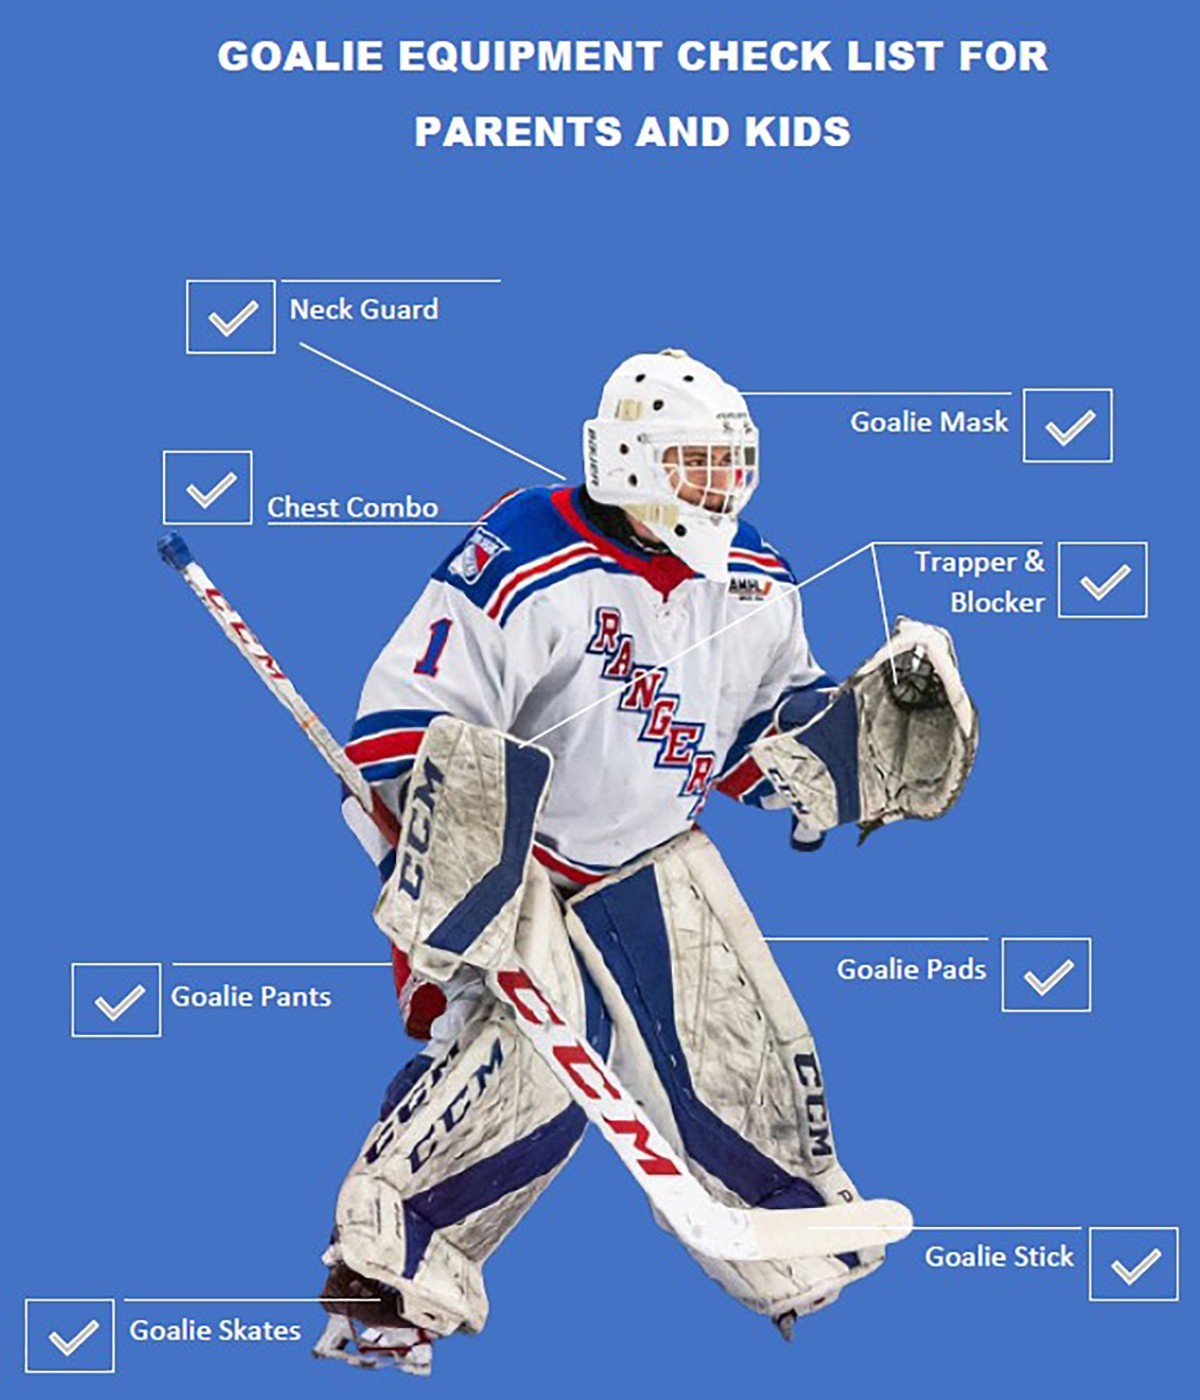
Equipment Checklist
SKATE SHARPENING
Skates need to be sharpened regularly. The length of time between sharpening is personal preference, but a parent can tell if a skate is dull by scraping the top of their fingernail over an edge. If the blade does not scrape the nail it is definitely time for sharpening. Another sign is players may begin to fall more frequently than usual or their skates may begin sliding on the ice instead of the edges biting into it.
RESOURCES
WHERE TO BUY GEAR
- Oshkosh
- Madison
- Brookfield
- Greenfield
Hockey Haven - Brookfield
- Madison
- Mequon
- Brookfield
- Appleton
- Grafton
- Wauwatosa
Scheels - Appleton
Facebook Marketplace
Frequently Asked Questions
Q. What size skates should I buy for my child?
A: The general rule of thumb for youth skates is to go down one size from your shoe size. For example, if they wear a size 6 shoe, they will likely want to start with a size 5 skate.
Q. Should I buy bigger skates and let my child “grow into them?”
A: Going this route is never recommended for skates. No matter what age, skates that are too big will affect everything they do on the ice. Skates that are too big will inhibit skating ability and the ability to improve, which is vital at a young age. There is the risk for potential injury, as well.
Q: What equipment is needed for ice hockey?
A: As per USA Hockey rules, youth players will need an approved helmet with a mask, mouthguard, neckguard, shoulder pads, elbow pads, athletic cup, pants, gloves, shin guards, skates, and a stick.
Q: How should my child’s hockey gear fit?
A: Helmet: While on, place your hands on the top and see how much the helmet moves. You do not want it to shake or wobble around much on your child’s head, but you also don’t want it too tight. Elbow pads: While fastened on the arm, there should be no slippage of the elbow pads, but they should not be too tight, either. Shoulder pads: You will want to make sure they fit snug against your child’s body while fastened.
Q: What flex hockey stick should my child be using?
A: The general rule of thumb is that half of your child’s weight would be the recommended flex, although it all comes down to their personal preference. For example, if your child is 40-50 pounds, a 20 flex stick is recommended. If your child is 50-70 pounds, a 30 flex stick is recommended, and so on.
Q: How do I put on hockey gear?
A: Everyone has their own way of doing it, but a good starting point is to start with the bottom first. Put on the jock first, then shins, socks, pants, and skates. From there, move to the upper body. Put on the shoulder pads first, then elbow pads, jersey, helmet, and gloves.
Q: How do you clean hockey equipment?
A: All base layers, jock, jersey, pants, inner liner of shin guards (if removeable), shoulder and elbow pads, and gloves can all be washed in a washing machine. If you choose to do this, make sure that you are using warm water, regular detergent (no bleach), and use the gentle cycle setting. Also, be sure to fasten all Velcro straps to ensure that they don’t get damaged. Following the wash, you can either air dry the equipment or put it in the dryer on the low setting.
Q: How do you store hockey equipment?
A: Hockey Equipment should be stored in a cool, open area whenever possible. You will not want to let it sit in your bag until the next time you need to use it. You can take it out of your bag and lay it out on the ground to air dry or place each piece of gear on an equipment drying rack.
Q: How do you keep hockey equipment from smelling?
A: Wear base layers. Base layers are a form fitting upper body shirt, compression pants, and a pair of socks. By wearing these layers, not only will it help wick away sweat and moisture, but it will also serve as a shield between the body and the equipment so that the body does not have direct contact with it. Removing the skate soles is also recommended. Doing so allows skates to air out and eliminates the opportunity for rust to form. Additionally, before placing the gear to air dry, you can use a few sprays of a gear deodorizer spray on each piece of gear. Deodorizer spray helps neutralize, destroy, and deodorize any odors.
Q: What accessories are recommended?
Skate guards. These are essentially a cloth “sleeve” that go over each blade, and they have two main functions. They help protect the skate’s blades against any potential nicks while in the hockey bag, and they also help dry the blades of any water to help prevent corrosion.
Clear sock tape. Clear sock tape is flexible and water resistant. A single strip can be wrapped around the shin guards and socks, just below the knee, which will help to keep everything in place and ensure that no equipment hinders skating ability.
Gear drying rack. It is recommended that players take the gear out of their bag after a skating session to let it air dry and a gear drying rack gives them a place to put everything.